Sie finden die verfügbaren Cumulative Updates für Microsoft Dynamics 365 Business Central on-premises direkt auf der Microsoft Support Website.
Released Cumulative Updates for Microsoft Dynamics 365 Business Central on-premises

Sie finden die verfügbaren Cumulative Updates für Microsoft Dynamics 365 Business Central on-premises direkt auf der Microsoft Support Website.
Released Cumulative Updates for Microsoft Dynamics 365 Business Central on-premises
Le système de gestion financière Microsoft Dynamics GP est le premier ERP de Microsoft à bénéficier de la nouvelle fonctionnalité Intelligent Edge depuis Microsoft Dynamics GP 2018 R2, la version la plus récente, parue le 1er octobre dernier (la version française est disponible depuis début novembre).
Intelligent Edge permet aux utilisateurs de systèmes on-premise (sur site) de tirer profit des technologies cloud, telles que Power BI et Microsoft Flow, en connectant les données de leur solution Dynamics GP à une version cloud de Microsoft Dynamics 365 Business Central. Les utilisateurs peuvent donc bénéficier de tableaux de bord, rapports et graphiques infonuagiques via l’appareil de leur choix pour mieux manipuler et visualiser leurs données GP.
Ainsi, Intelligent Edge fournit des possibilités de mobilité et d’analyse sans pareil. Cet outil gagnera sans doute en importance au fil du temps et devrait devenir disponible pour les autres systèmes ERP de Microsoft, par exemple la version on-premise de Microsoft Dynamics 365 Business Central (auparavant appelée Dynamics NAV) au cours des prochains mois.
Bien sûr, la version Dynamics GP 2018 R2 apporte également une gamme de nouvelles fonctionnalités et d’améliorations. Celles-ci visent à augmenter la convivialité de l’application et à permettre aux organisations de gérer leurs finances et leurs affaires avec les meilleures technologies et outils disponibles. Les changements se concentrent principalement sur les aspects suivants :
De plus, puisque la date de sortie des nouvelles versions est maintenant en octobre plutôt que décembre, les sorties de GP coïncideront dorénavant avec les mises à jour des autres produits de Microsoft. Ceci facilitera le renouvellement des contrats en réduisant le nombre de dates de renouvellement que les clients ont à gérer.
Nous sommes enthousiastes à l’idée de ce que cela représente pour les utilisateurs de Dynamics GP et nous avons hâte de voir comment les technologies cloud aideront les entreprises à gérer leurs affaires à l’avenir.
Par JOVACO Solutions, spécialiste d’implantation la solution Microsoft Dynamics GP au Québec
We’re going to make an example extension that adds a basic newsletter system inside of NAV using an Angular component (an open-source HTML editor) inside a JavaScript Control Addin deployed via an extension.
A teaser of the beautiful combination of Angular inside the NAV Client via Extensions that we’ll be building together:

Some disclaimers:
You’re going to need Business Central setup, the web client functional, a development database, Visual Studio Code, all those fun basics from the Business Central side. For my development, this was using an On-Premise local sandbox Cronus database.
For Angular, you’ll need to install the Angular tools, which are outlined nicely at https://angular.io/guide/quickstart.
The overall process (this will become links as each post is added):
As a Bonus post, we’ll also cover how to handle resizes of the Angular model and how to get the Web Client to resize to reflect those changes.
We’ve got a lot to do here, so a quick map:
Drop to your command prompt and head into your working folder. Type ng new HTMLEditControl to create the folder/project, which you can open in Visual Studio Code once complete. (Keep command prompt open for a moment.)
Note: I would recommend keeping this Angular Project Folder and the AL Extension in separate folders, as we’ll only need the compiled/transpiled JS/CSS files to be included in the Extension.
Our target goal is a very simple HTML/JS page that has one control on it, an HTML Editor that is open source called NgxEditor. To install this, in your command prompt, head into the HTMLEditControl folder and type npm install ngx-editor –save to add the library to your project. (You can also do this within the integrated Terminal in VSC, more on that later.)
In my case, I get warnings about needing two other peer libraries:
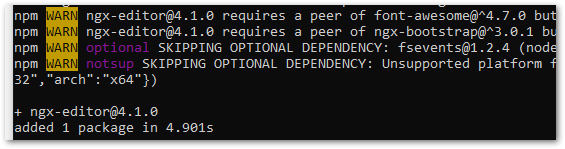
Font Awesome and NgxBootstrap are needed. If you’re unfamiliar with Angular, peer dependencies are a common need and must be installed manually. What you need is right in the error, so we’ll just type:
npm install font-awesome@^4.7.0 –save
npm install ngx-bootstrap@^3.0.1 –save
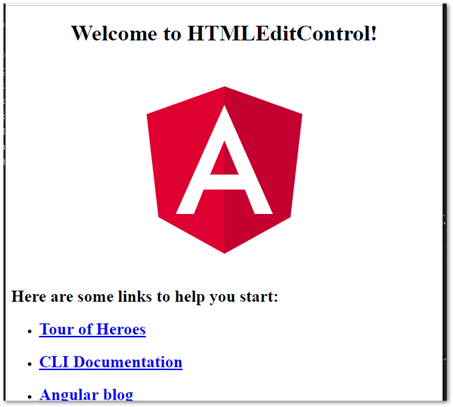
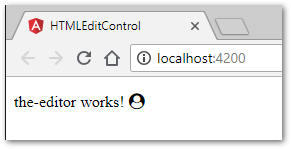
Now let’s make sure everything is healthy by opening up the default page. In Visual Studio Code, open the HTMLEditControl folder, then Terminal->New Terminal. Type ng serve and we should get a browser window like so:
Our “application” in angular is a single control on a page, so let’s make a new component for that to replace the above. In another New Terminal, do ng g c TheEditor. (Generate Component if this is new to you.)
If you open up src/app/app.component.html, you’ll see the HTML for the above page:
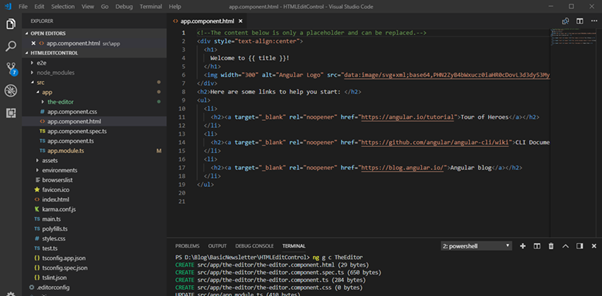
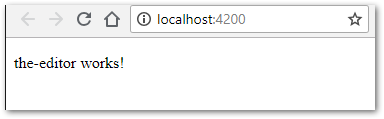
Clear all that out. We’ll only want to call our new component with <app-the-editor></app-the-editor>. Since Angular’s serve system supports live development, if you still have that window open, you’ll see it replaces the page (when you hit save) with just this tiny info:
The earlier commands downloaded and added the libraries to our roster of available tools, but that doesn’t mean Angular knows we want them. For minimizing the resulting JS pile, only the necessary libraries you specify explicitly will be included. Where you specify that is in the src/app/app.module.ts file.
Let’s look at the installation guide for the NgxEditorModule:
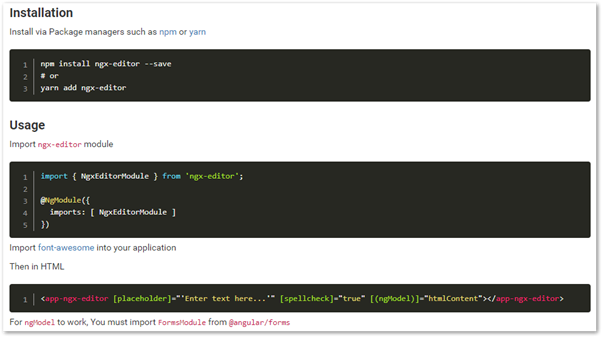
We need to
We’ll add the import up top (making it available as a datatype), then add it to the NgModule’s import section (making it relevant to our output). In our src/app/app.module.ts file:
import { BrowserModule } from‘@angular/platform-browser’;
import { NgModule } from‘@angular/core’;
/* Import the modules so
we can refer to their Classes */
import { NgxEditorModule } from‘ngx-editor’;
import { AppComponent } from‘./app.component’;
import { TheEditorComponent } from‘./the-editor/the-editor.component’;
@NgModule({
declarations: [
AppComponent,
TheEditorComponent
],
imports: [
BrowserModule,
/* Import them into THIS module we’re making */
NgxEditorModule
],
providers: [],
bootstrap: [AppComponent]
})
exportclassAppModule { }
For font-awesome, which is primarily CSS data, according to the docs:
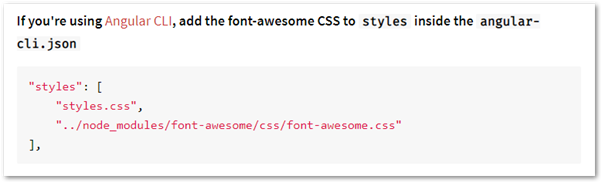
Easy enough, though in our Angular 6, it’s angular.json in the root folder. We’ll otherwise add it as it says and see what happens when we restart ng serve

Yup. Welcome to rapidly evolving tech and trailing documentation, a staple of the Angular ecosystem. It’s free, but you pay in having to figure more things out, so bear that in mind when you estimate projects.
To figure out what happened, take a look at the path in the error. We don’t need the preceding ../ section. Let’s remove that and ng serve again.
Now, pop open src/app/the-editor/the-editor-component.html. Let’s add a font-awesome tag in this to test the results. For example, how about User Circle? According to the documentation, we need:
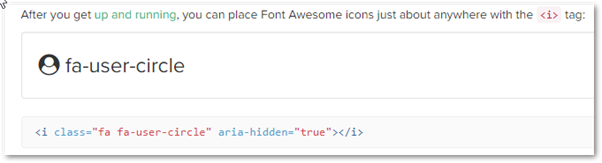
Our new the-editor.component.html:
<p>
the-editor works! <i class=“fa fa-user-circle”
aria-hidden=“true”></i>
</p>
Results in:
For the FormsModule, we’ll need to revisit app.module.ts and add:
import { FormsModule } from‘@angular/forms’; // <– NgModel lives here
and import it in our NgModule imports section.
I also ran into an undocumented dependency on HttpClient, so we need that as well. The final app.module.ts at this stage:
import { BrowserModule } from‘@angular/platform-browser’;
import { NgModule } from‘@angular/core’;
import { FormsModule } from‘@angular/forms’; // <– NgModel lives here
import { HttpClientModule } from‘@angular/common/http’;
/* Import the modules so we can refer to their Classes */
import { NgxEditorModule } from‘ngx-editor’;
import { AppComponent } from‘./app.component’;
import { TheEditorComponent } from‘./the-editor/the-editor.component’;
@NgModule({
declarations: [
AppComponent,
TheEditorComponent
],
imports: [
BrowserModule,
/* Import them into THIS module we’re making */
NgxEditorModule,
FormsModule,
HttpClientModule
],
providers: [HttpClientModule],
bootstrap: [AppComponent]
})
exportclassAppModule { }
We need to update our the-editor.component.html file with the actual control:
<app-ngx-editor[placeholder]=“‘Enter text here…'”
[spellcheck]=“true”
[(ngModel)]=“htmlContent”
resizer=“basic”
(ngModelChange)=“onHTMLChange()”>
</app-ngx-editor>
For being able to compile this, we’ll also add a new variable to the-editor.component.ts file:
import { Component,OnInit } from‘@angular/core’;
@Component({
selector: ‘app-the-editor’,
templateUrl: ‘./the-editor.component.html’,
styleUrls: [‘./the-editor.component.css’]
})
exportclassTheEditorComponentimplementsOnInit {
publichtmlContent: string;
constructor() { }
ngOnInit() {
}
}
Restart your ng serve and you should finally be seeing this:

When Angular applications are built, there’s a lot going on and it’s well beyond the scope of this post. But, the important thing to know is that we’ll get a few key Javascript files, a CSS file, and various resource files.
If you simply type ng build, you’ll see the array of files it makes:
The files are also huge:
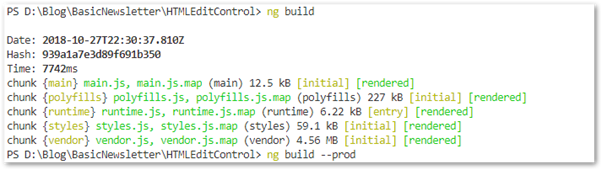
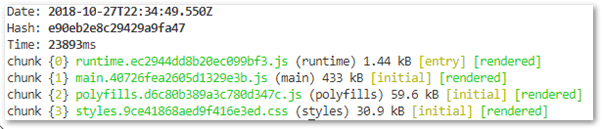
This is in debugging form, all the code at full size, with maps for debugging tools. We need to add –prod to our command (note, that’s dash dash prod), which at least makes the list shortened:
With a much smaller footprint:
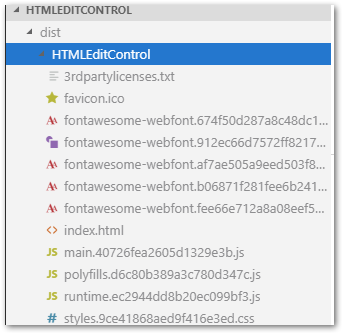
But, all those hashes in the names are going to cause us some grief later, so let’s fix that with –output-hashing none (note, that’s dash dash again)
Excellent. A quick review of the files:
With all that in place, we have more to do here, but mostly in integration with our extension that we don’t have yet. On to the next part!
In today’s blog, we’ll walk you through the steps necessary to upload a file to Azure Blob from SSIS. Enjoy!
To download the Azure Feature Pack, click here.
3. Once downloaded, the Azure tab under SSIS Toolbox will appear in the UI:

4. Drag and drop Azure Blob Upload Task in the control flow. Note that because it is not yet configured, SSIS will display a red cross mark, indicating error. Hovering over the error displays this: ‘Azure Storage Connection Manager is not valid.’

5. Open the Azure Blob Upload Task in the control flow reveals a few fields that need to be populated to connect to Azure.

Let’s go through each of the five sections:
1 Basic– Here you can change the Name and Description as needed.
2 Connection – Clicking here reveals AzureStorageConnection. Click on it to bring up the Azure Storage Connection Manager Editor popup box.

As shown, a Storage account name and Account key are both necessary. To create these, go to the Azure portal and click Storage accounts> Add.

A popup box is revealed. Provide a name for the storage account and modify any other fields, as necessary.

Once the storage account is created, select it in the portal menu. Under SETTINGS, click on Access Keys to find the key to connect to your storage account.

Back in the Azure Storage Connection Manager Editor, provide the information. When the correct information is provided, a Test cnnection will succeed.

3 Destination– Here you can do the following:
4 Source – Allows you to provide the path of the file you want to upload.
5 Source Filter– Allows you to provide the name of your file, as well as time ranges (optional).

6. After everything is set correctly, run the SSIS: the job should complete successfully.

7. Navigate again to the Azure Portal and click on Storage Account. Select your container and then click Blob Service> Blobs to see your container. Click on it to see the files uploaded:

Hopefully this guide has been helpful. Be sure to subscribe to our blog for more Dynamics 365 tips and tricks!
Happy D365’ing!
I’m not going to rewrite the guide for setting up your VS Code environment for Extension development, but we’ll go through the basic steps of creating your extension assuming you have a functional NAV/BC environment to work with.
In our VS Code window, Alt-A then Alt-L will trigger the AL Project Creation process, asking us where to put the extension. For sanity, I’m going to be using a folder structure like so:

Our AL Extension does not need the heaping pile of source library files that our Angular App will, so we’ll keep them separate.
After you give the Extension Creation process a folder, it will ask which server you are working with, Cloud or On-Prem. I’m using on prem, so it asks me for some authentication. Odds are pretty high your authentication will fail. You’ll see some errors in the Output Panel:

Mostly I’m getting Reason: Not Found errors and you probably will too. It defaults to looking for an instance on localhost called BC130, not the On-Prem default, DynamicsNAV130. Thankfully it drops you right to your new launch.json file. Change your Server and Server Instance as appropriate.
You may also need to update the Authentication from UserPassword to Windows, depending on your installation.
Since I’m going to be adding the jumping off point in my extension to the Segments List of the system, I’m also going to take the opportunity to change the startupObjectID from 22 (Customer List) to Page 5093 “Segment List”. Tip: If you aren’t 100% sure of the Page ID, you can usually find it in the URL:

When you hit Save on this file, you should get a pop-up that notices you don’t have your Dynamics Symbols from the server. Hit Download symbols to correct that.

If you don’t get this pop-up, press Ctrl+Shift+P and select AL: Download symbols.
You’ll probably want to update the app.json file next with info relevant to you. More details on that here. Make sure you have a strategy around your idRange with your organization/customers.
For our demo, we’ll use object range 73000 to 73050. When I save this change, my HelloWorld.al file will go red in the list, indicating a problem, but that’s ok, we’re going to delete it. Go ahead and do that now.
Quick Aside: Microsoft has some guidelines on the expected standards for Extension development. Waldo has not only useful recommendations that build on top of that, but also VS Code Extensions to support it. I’m new to this, but we’ll try to follow Microsoft’s throughout. If I was making a fully-functional Extension, with logging and setup the way we should, I would absolutely follow Waldo’s.
Now, strangely, Microsoft’s “AL Go!” we ran to create the basic folder/files? That doesn’t setup the folders to match their guidelines. It’s just a nearly empty project.
We’ll create the 3 Microsoft recommended folders, src, res, and test. We’ll create two objects, one a page, one an extension to add the button to Segments. We’re looking at this:

I personally find Pag5093-Ext73001.AddHTMLSend.al just awkward to type or retain, but I presume this is a useful naming schema at some point.
Opening up Pag73000.SendHTML.al, type tp to get the snippets to offer a template to you:

You get a lot of content here (way more than I’ll show):

Skipping ahead, we’ll have this as the content of Pag73000.SendHTML.al:
page73000 SendHTML
{
PageType = Card;
ApplicationArea = All;
UsageCategory = Administration;
SourceTable = “Segment Header”;
layout
{
area(Content)
{
group(Editor)
{
}
}
}
actions
{
area(Processing)
{
action(SendEmail)
{
ApplicationArea = All;
trigger OnAction()
begin
Message(‘This button would send something.’);
end;
}
}
}
var
rawHTML: Text;
}
And Pag5093-Ext73001.AddHTMLSend.al:
pageextension73001 AddHTMLSend extends“Segment List” // 5093
{
actions
{
// Add changes to page actions here
addlast(Processing)
{
action(“Send HTML Email”)
{
ApplicationArea = All;
RunPageOnRec = true;
RunObject = page“SendHTML”;
}
}
}
}
Now hitting F5 will run the solution with your extension installed and active. I’ve noticed that here and there I sometimes have to force refresh my browser to see the changes, but that’s no big deal (Ctrl+F5 and it’s fine).


Great, the page exists and is working. Now let’s do more interesting things with it.
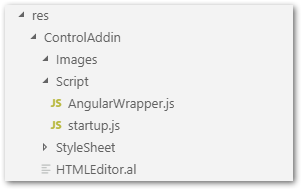
Javascript control add-ins in NAV/BC are a little strange to work with. We need a couple of JS files to start with: one that is our Startup script, and one that is our Wrapper around our Angular solution. Angular does a LOT of change detection and all sorts of magic with execution zones that NAV/BC does not know about or need to care about, so this will be a sort of API for AL to talk to Angular. We’ll also need an AL file to define the controladdin for other parts of the AL Extension to interact with.
I found the Javascript Add-In documentation a little sparse, but between a few blog posts, this seems to be the right structure to aim for based on what we have:
Open up our startup.js file and add this extensive pile of code:
init();
Microsoft.Dynamics.NAV.InvokeExtensibilityMethod(“ControlReady”,[]);
init() will be a function in our Wrapper. The 2nd line is a super important concept. This is how JavaScript fires an event to NAV. (I feel less bad about sometimes calling it NAV if they still refer to it that way in their functions.) The params are Name, Param. More on this later, but understand that we have to asynchronously fire an event at NAV from Javascript, and in NAV, we’ll have to listen for it.
Open AngularWrapper.js now and define a basic function:
function init() {
}
Now, a core understanding: Control Addins don’t have any HTML file, only what is generated at runtime by the Web Client. This means we must add HTML with Javascript. This will be a problem soon when we bring in our Angular app, which is going to check the DOM for where it should exist and the DOM is basically empty.
Next, open up HTMLEditor.al and use the tcontrolpanel snippet to get a massive pile of settings. We’ll replace that with
controladdin HTMLEditor
{
RequestedHeight = 300;
MinimumHeight = 300;
MaximumHeight = 300;
RequestedWidth = 700;
MinimumWidth = 700;
MaximumWidth = 700;
VerticalStretch = true;
VerticalShrink = true;
HorizontalStretch = true;
HorizontalShrink = true;
Scripts =
‘res/ControlAddin/Script/AngularWrapper.js’;
StartupScript = ‘res/ControlAddin/Script/startup.js’;
event ControlReady();
}
This won’t do much, but we can test that the Control Addin works by listening for the ControlReady event in AL.
Back in the Pag73000.SendHTML.al file, we can now add our usercontrol to the layout, like so:
layout
{
area(Content)
{
group(Editor)
{
/* Our new code */
usercontrol(“HTMLEditor”;HTMLEditor)
{
trigger ControlReady()
begin
Message(‘Control Addin HTMLEditor Ready’);
end;
}
}
}
}
Now if you hit F5 to Debug the solution, possibly with a browser force-refresh (Javascript is often cached), you should get this message:

OK, so, if you skipped ahead, dropped the JS and CSS files from your Angular into the Control Addin folders, added all three JS files to your AL file, ran the Extension, and looked at the Console errors, you’d see this mess:

Or more likely, you’d see this baffling error stack:

Two different errors I’ve mentioned our need to avoid.
In the former, our Angular is looking for <app-root> in the HTML, which won’t exist. The latter is because the three Angular scripts MUST load in the right order, in serial not parallel.
If we just add the following JS to init(), we can solve the first issue, right?
vardiv = document.getElementById(‘controlAddIn’);
div.innerHTML += ‘<app-root></app-root>’;
(Note: the autogenerated HTML has a DIV with the ID controlAddIn so we can do this sort of DOM modification.)
This adds <app-root>, so we’re done, right? No, you’ll get the same error. All the javascript scripts are run in parallel (or so immediately that it functionally is parallel). So, while init() is busy adding things, Angular is already failing.
Baffling, yes? Here’s the “help” on the Scripts Property (emphasis mine):
Although this property is optional, the control add-in must either specify the StartupScript property or specify one or more scripts. Scripts can be either external resources referenced using a URL or can be embedded within the extension. Embedded script files must be added to the extension project folder in Visual Studio Code and referenced using a relative path. For security and usability reasons, it is recommended to reference any external scripts by using the HTTPS protocol. Scripts are loaded immediately when the control add-in is initialized.
So… what precisely is the difference? One takes a list, one takes a single file – but both are executed immediately. Useless for our needs.
This means we must handle loading the scripts dynamically, in order. But, NAV/BC don’t let us load script resources. We have precisely two methods for getting anything:
That’s all we have. A lot of trial error and help from Netronic’s fabulous Blog Series on their similar battles and I found how to hijack the GetImageResources call to load JS files later.
First, we need to put all our files in the right place. This will get annoying to do manually and we’ll have to do this every time we build our Angular solution, so a quick batch file should help.
In VS Code, though, let’s go ahead and just Add Folder to Workspace to bring the Angular solution into the same workspace. Now in our Angular HTMLEditor folder, make a file called angularbuild.bat and add all this, updated to match your paths:
@echo off
call ng build –prod –output-hashing none
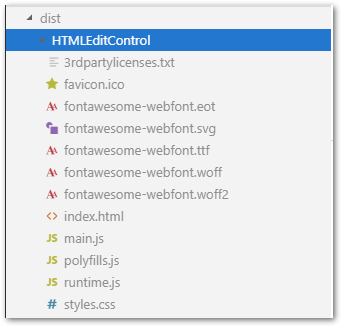
xcopy D:\Blog\BasicNewsletter\HTMLEditControl\dist\HTMLEditControl\*.js D:\Blog\BasicNewsletter\BasicNewsletterAL\res\ControlAddin\Images /E /Y /Q
xcopy D:\Blog\BasicNewsletter\HTMLEditControl\dist\HTMLEditControl\styles.css D:\Blog\BasicNewsletter\BasicNewsletterAL\res\ControlAddin\StyleSheet /E /Y /Q
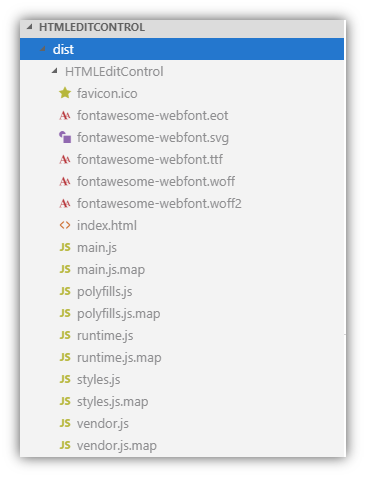
Run that and you should end up with something like this in your AL ControlAddin folder:

Back in HTMLEditor.al, we need to add a weird section:
controladdin HTMLEditor
{
RequestedHeight = 300;
MinimumHeight = 300;
MaximumHeight = 300;
RequestedWidth = 700;
MinimumWidth = 700;
MaximumWidth = 700;
VerticalStretch = true;
VerticalShrink = true;
HorizontalStretch = true;
HorizontalShrink = true;
Scripts = ‘res/ControlAddin/Script/AngularWrapper.js’;
StartupScript = ‘res/ControlAddin/Script/startup.js’;
StyleSheets = ‘res/ControlAddin/StyleSheet/styles.css’,
‘https://cdnjs.cloudflare.com/ajax/libs/font-awesome/4.7.0/css/font-awesome.css’; /* far simpler to load Fontawesome from CDN, but does require net access. */
/* Super SUPER weird to have to treat javascript files like images. But here we are */
Images = ‘res/ControlAddin/Images/runtime.js’,
‘res/ControlAddin/Images/polyfills.js’,
‘res/ControlAddin/Images/main.js’;
event ControlReady();
}
Now, we still have ANOTHER weird barrier with GetImageResource– it’s not path aware! I think this may be a bug, so we’ll see if this remains necessary.
If we were to call Microsoft.Dynamics.NAV.GetImageResource(‘runtime.js’), it will return:
https://localhost/dynamicsnav130/Resources/ExtractedResources/EE418FB/ /runtime.js?_v=13.0.24623.0
So, the server extracts the Addin with the folder hierarchy intact, but GetImageResource ignores that entirely. (Aside: I have yet to see the temp folder where addins extract to ever empty out. This could be a large problem. Perhaps a defect?)
Thankfully, AL has string replace() to rescue us. Here’s the crazy nested code you’ll need to load the app in the right order:
function init() {
var div = document.getElementById(‘controlAddIn’);
div.innerHTML += ‘<app-root></app-root>’;
//Dynamically load the 3 angular Dist JS files.
var runtimeUrl = Microsoft.Dynamics.NAV.GetImageResource(‘runtime.js’);
var polyfillUrl = Microsoft.Dynamics.NAV.GetImageResource(‘polyfills.js’);;
var mainUrl = Microsoft.Dynamics.NAV.GetImageResource(‘main.js’);;
//Something is wrong with GetImageResource, so we have to manually add the subfolder name Images
runtimeUrl = runtimeUrl.replace(‘runtime.js’,‘res/ControlAddin/Images/runtime.js’);
polyfillUrl = polyfillUrl.replace(‘polyfills.js’,‘res/ControlAddin/Images/polyfills.js’);
mainUrl = mainUrl.replace(‘main.js’,‘res/ControlAddin/Images/main.js’);
var runtimeScript = document.createElement(‘script’);
runtimeScript.onload = function () {
//waiting for runtime to load beforeloading Poly
var polyfillScript = document.createElement(‘script’);
polyfillScript.onload = function() {
//waiting for poly to load before loading Main
var mainScript = document.createElement(‘script’);
mainScript.onload = function() {
//do stuff with the script as needed
};
mainScript.src = mainUrl;
document.head.appendChild(mainScript);
};
polyfillScript.src = polyfillUrl;
document.head.appendChild(polyfillScript);
};
runtimeScript.src = runtimeUrl;
document.head.appendChild(runtimeScript);
}
Now a reload of everything should finally result in:

It’s not perfect and it doesn’t DO anything yet, but if you’ve made it this far in your copy, you technically have made an Angular application work inside NAV/Business Central.
Being a mature product, Dynamics 365 rarely lends itself to short tips these days. Microsoft Flow, new kid on the block, on the other hand, is ripe for short bursts of wisdom. Today’s one is from Rob Dawson (and you can send your nugget to jar@crmtipoftheday.com too!)
With the drive toward use of Flow instead of background workflows, some condition operators are not the same. Like this easy but frequently used one.
It’s always good practice to check if a value exists before overwriting it in a workflow. Dynamics 365 CE or CDS Workflow condition is Does Not Contain Data. This is how to do it in Flow. Select the field from the Dynamic content then null function from the Expression builder.

(Facebook and Twitter cover photo by Jonas Jacobsson on Unsplash)
 This post is part of the series on Upgrading to Jet 2019.
After completing the configuration of Jet Analytics 2019, I discovered that the Jet Data Manager Scheduler was not running:
I was also unable to start the service:
This was puzzling, what with the previous version not having been a problem when I installed it. However, there was only a few small steps required to get it running:
Once you’ve done this, the service should be correctly running.
| Upgrading to Jet 2019 |
|---|
| What's New In Jet Analytics 2019 |
| Install Jet Analytics |
| Upgrade Jet Analytics |
| Start Jet Analytics Service |
Read original post Upgrading to Jet 2019: Start Jet Analytics Service at azurecurve|Ramblings of a Dynamics GP Consultant
In Dynamics 365 every Business Process Flow has a corresponding entity which is automatically created and used to record state. This entity can be made available in grids, views, charts, and dashboards. Here is an example of the entity created for the Lead To Opportunity Business Process Flow called Lead To Opportunity Sales Process, take note that you cannot open a record like standard entities.

Since the Business Process Flow state is not stored against a record like previous versions of Dynamics 365 but stored against the Business Process Flow entity record, we would need to query this entity to identify what state the current Business Process Flow is on for a specific record.
Let’s take a scenario where users are required to complete all stages for a Lead to Opportunity Business Process Flow before the Opportunity can be closed as won.
1. Create a plugin that checks if Opportunity Close is the target entity
2. Obtain the opportunityid field to get the Id of the Opportunity record being closed as won.

3. Query the Lead To Opportunity Sales Process entity to check a least 1 record has the opportunityid and a statuscode that is not Finished(2).
4. If there is a record found, then throw a plugin exception to stop the close as won process and display an error to the user indicating that the Opportunity can not be closed as won.

5. Register the plugin against the Win Message and the Opportunity Entity

Once the plugin is setup users will be presented with a Business Process Error when trying to close an Opportunity as won with incomplete stages.

Only when all stages have been Finished would the Opportunity be closed as won.

So, to conclude a business process flow state is stored against its corresponding entity and the status of Finished indicates that all stages have been completed for a specific record.