Managing screen space in Business Central
Dynamics CRM Portal Shopping Cart Configuration Wizard
Dynamics CRM Portal Shopping Cart Configuration Wizard
Configuring Dynamics CRM to display list of products or services on CRM Portal requires complex set of records and JavaScript in CRM. Shopping Card Wizard does all the work for you.
Shopping Cart Configuration Wizard is FREE solution - no strings attached. Click here to download the solution
Step 1: Preparing Product / Service entity in CRM
Create new CRM Entity or use an existing entity that represents the products or services to be listed on CRM portal. We link the following attributes of the entity, when displaying the list on portal:
Name- product name or product number. The Name is used as link to another web page that provides more information and details regarding the product and related products. The page is a Form of the entity.
Description – short description of the listed product.
Price – price per unit
Product image URL– each product can have different image. Users can configure these three images: product image, an image of basket, and the image for the delete function. The last 2 images are one image for all products.
Portal Form and Portal View– It’s highly recommended to create a separate portal form from other in-house CRM forms, to present relevant data to portal users. The form includes extra information regarding the product / service provided, and can include sub-grids from related entities to the product entity. An example for sub-grids are list of supporting documents, brochures, and images, or related / complementary products to the item displayed on portal.
Portal view filters which products / services to be listed, such as all active records or records that belong to a specified group.
Step 2: Configuration Wizard
Once the CRM entity configuration is completed, entering details to the Wizard is a simple selection that links between the fields, form, and view to the corresponding fields form and view in the configurator. For ease of testing the solution we provide temporary images stored on Dropbox. We recommend these URLs will be replaced with permanent and personalised locations.
To clear cache and reload new data log on to portal as Portal Administrator using this URL:
https://PortalName.microsoftcrmportals.com/_services/about
Upon completion of online purchase the following records are updated in CRM:
Basket & Basket items– the items selected to be purchased
Basket History
Payment– if Credit Card Payment Gateway is installed, the confirmation reference / details, received from the credit card provider, are stored in this record.
Step 3: Credit Card Payment Gateway
The Wizard is free to use solution. The solution also includes Credit Card Payment Gateway sold at per portal at one off payment at very competitive price. Credit Card Payment Gateway can be added or removed using Configuration Wizard.
The solution is using the below settings in Sandbox mode:
API Login ID: 7W7sGz2L
Transaction Key: 2W4t8r3a22qU2wPC
And can be tested with these sandbox accepted credit card numbers
370000000000002 American Express
6011000000000012 Discover
5424000000000015 MasterCard
4007000000027 Visa1
4012888818888 Visa2
Need support? Email us Sales @DynamicsObjects.com
How items are listed on Portal
More Info Page (CRM form with sub-grid)
The post Dynamics CRM Portal Shopping Cart Configuration Wizard appeared first on CRM Software Blog | Dynamics 365.
Controlling the Visual Studio workspaces to your Dyn365FO developers
Introduction
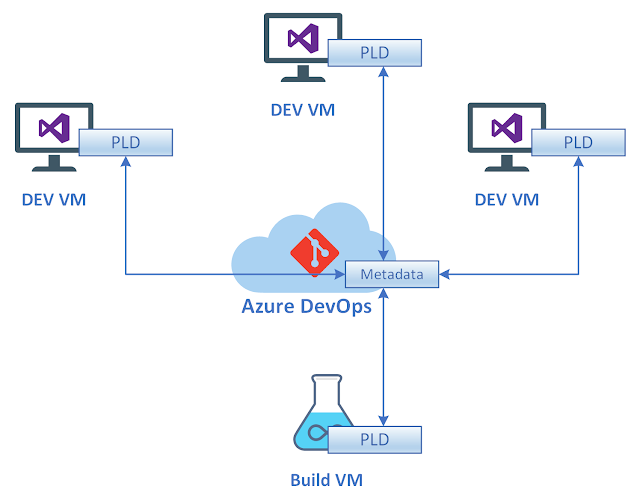
At the time of writing, doing development for Microsoft Dynamics 365 for Finance and Operations (FnO) require a dedicated development machine. This machine is pre-configured with Visual Studio extension that allow for achieving FnO development. One important and perhaps peculiar fact with these environments is the fixed disk location where you can create, edit, save and build your modifications. The folder is more often referred to the "Package Local Directory", but I will use the acronym PLD in the rest of this article. This is the folder containing the packages/modules, and you may have them either with or without source code. Typically vendor solutions are shipped only in their binary form, meaning you do not have the "design time" metadata, but only the "run time" payload. As for Microsofts own packages/modules, you will typically have both the metadata and the binaries, allowing you to view and step through code while developing and debugging. And of course, your customizations (assuming you are a developer) will have its metadata, and after your local first build, its binary counterpart (plus other artifacts, depending on what you're creating).Workspace
This post is about the "workspaces" in Visual Studio.So what is the deal with the "workspace"? Well, it is a necessity when you want to develop. It is basically what defines the paths to your local copy of the code you are sharing with the rest of the team. And for FnO there is one path that is fixed, out of the box, and that is the PLD. You are free to setup other folders, and share them with the team, but the workspace needs to have at least one entry that refers to the PLD. All customizations you want to share with the team, and share with the BUILD machine, needs to be in the PLD, and added to source control and committed to the central code repository.
Ok, so that is all fine. Any other considerations?
Yes! The developer who creates the workspace actually ends up being the "owner" of the workspace, on that machine. So if another developer connects to the same machine and wants to develop, using their own user and credentials, the second developer needs to be able to work against a workspace pointing to the PLD. Otherwise, the second developer is blocked from doing development.
So what's the problem? Well, by default, a newly created workspace is private and only the owner of the workspace can use it. To make things worse, any other user who wants to create their own workspace on the same machine will not be able to point it to the PLD. Only one workspace can point to a single folder at that machine at a time, and the PLD is such a fixed single folder (at the time of writing).
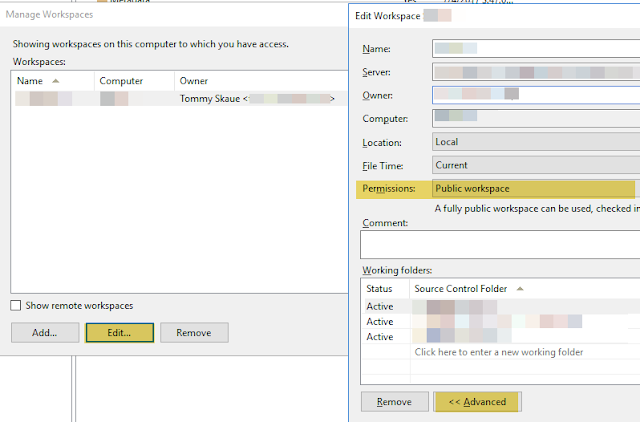
There is a solution, though. The initial owner needs to change the workspace from "Private" to "Public", allowing any other developer connecting to the same machine reuse the initial workspace.
This is a simple solution where the same development machine is shared between developers. It is also smart if for any reason a developer has pending changes on that machine, then takes a few weeks of holiday, and another developer needs to connect and commit them. Yea, that can happen.
Administer the Workspaces
Ok, so what if the developers create the workspaces themselves, and set them up as Private, forgets and then someone else have to reuse it. Or if you simply want to go through and check the created workspaces out there.Well, the workspaces and information about them is also stored centrally, and someone with the "AdminWorkspaces" privilege can change them (a permission by default granted to the Azure DevOps (VSTS) Organization Security group called "Project Collections Administrators").
So in this post I will show how you can do this. There are several articles and posts out there discussing this, but it's always nice to share this in the context of Dyn365FO development, in my opinion.
If you have the necessary permissions, you can run the "Developer Command Promt for VS2015" available on one of your development VMs. I here assume you have run Visual Studio at least once, and connected to your Azure DevOps (VSTS) organization you are working towards.
If you run the following command, it will list all the workspaces created.
tf workspaces /owner:*
You will see a list of workspaces by the name, owner and machine. The next thing you can do is edit one of the workspaces by running the following command:
tf workspace WORKSPACENAME;OWNER
When referring the owner, use the email address for simplicity.
The workspace form now lets you change the properties like permissions from Private to Public, and you can even change the owner (again, use the email address) if you for example need to take over the workspace of someone who has since been deleted as user.
You can also remove old and obsolete workspaces by using the following command:
tf workspace /delete WORKSPACENAME;OWNER
It goes without saying, changing the workspaces while they are in use, is obviously not very smart. Change the workspaces with care, or you might ruin someone elses work and day.
Using Team Foundation Sidekicks for VS2015
There is another option as well, a free tool that also lets you administer workspaces, if your user has the necessary permissions.You can download it from here:
http://www.attrice.info/downloads/index.htm#tfssidekicks2015
(Tip! Use Google Chrome to download the MSI, if Edge/IE blocks you)
Talking Points in D365 AI For Sales
Productivity just went through the roof!
MB2-719 Certification: Dynamics 365 for Marketing – Track Online Behaviour
Access protected file share
Dynamics 365 Installation – Part 7 – Setting Primary database server as Failover and Synchronize DBs with other DB Server
RDLC Reports Development and Visual Studio 2017

[Just a note to myself as I always need to look up what to download and install on Visual Studio 2017 to allow me to work on RDLC layouts for my reports.]
Read & process CSV files programmaticaly
AL Basics – Part-1
D365 Quick Tip: Est. Revenue calculations on Opportunity
MSDyn365FO. Code to build cross reference data without a full compile.
Cumulative Update Summary for December 2018
View Now – Dynamics 365 Unified Interface Webinar
MSDYN365BC - AL Development 02 - How to Develop New Page in Database?
I am sure everyone was able to develop a table in AL based on the Last article. If you haven't read the earlier article, then refer to the table of content.
As promised in the article we will build the new page as per customer requirements.
The customer requires a new list page to add, modify & delete data stored in the database.
Let's try to add this page to our extension.


