Just a quick update… Thanks to Jonas Rapp ‘s excellent suggestion, I’ve deployed the controls Futurez.XrmToolbox.Controls as a NuGet package. I feel silly that I had not considered this...(read more)![]()
Shared XrmToolbox Controls NuGet Package
↧
↧
Personalizing Custom Entity Icons with Metro Studio
In Dynamics 365, an administrator can customize the icons that are displayed for custom entities. These entities will display an unattractive default image in the navigation panel, as well as a miniature unattractive default image in certain places like the configuration area.
Have a look:


To address this, we need to collect custom icons for all our custom entities. A great tool to make this quick and easy is Metro Studio 5 by Syncfusion. You can search for this program and download a desktop version, which we find to be the most convenient. The interface allows you to instantly search thousands of flat pre-configured icons for download. It even gives you preset icon categories to quickly find icons that apply to your vertical.

Further, if you ever need to make bulk changes to your icon configurations, Metro Studio will store them in ‘projects’ that allow you to return later and re-export, make changes, etc. Just drag an icon to create a new project, then add to that folder the additional icons you will need for your project.

You can see we’ve added three icons to the project below:

We can now bulk edit those three icons to meet the standards we need for them to cooperate in D365.
First select all custom icons (as indicated by the check marks). Then create the 32×32 icons first by dragging the first size slider to 32. Now set to 1 using the next slider (you can experiment with your preferred padding for your project). Set the background color to ‘transparent’ – that way, we can control the background color in D365 and won’t be limited to the single color we are exporting. Lastly, choose the icon color. OB icon color for 32×32 is white (#FFFFFFFF). See below for an exam of these customizations applied in bulk to the custom icons:

Now we can export these as .png files to our local machine. Then repeat the above steps to create our 16 x 16 icons. However, for these, set the slider size to 16, set the padding to 0, leave the background transparent, and set the color to a black or grey of your choice (we use the OOB gray, FF5E5E5E). Export these, as well, and keep track of them.
Note: You can also rename the icons here. It may help to have a logical name when you import them as web resources. For example, “samplecustomicon16” or “samplecustomicon32.”
Now, for the easy part that most of you are familiar with. We will update the old standard icon in D365 and replace it with our new awesome icon. First, load the new icons into CRM as web resources.
Go to Web Resource> New in the configurator.
Follow the settings below, then repeat this process for the 16×16 icons:

Note: Be descriptive with a 16 or 32 in your naming convention so they are easy to locate later.
Now, with all your icons added as web resources, in the D365 configurator locate and select the entity for which you wish to update icons.
In the toolbar at the top of the entity, select Update Icons.
You can now lookup your 16- and 32-sized custom icons and associate them with the custom entity.

Once you’ve saved and published, you can see that the new icons are in place!

Easy, awesome, and even a little fun. Get more Dynamics 365 tips and tricks on our blog!
Happy Dynamics 365’ing!
↧
How can Microsoft Dynamics help you analyze data more efficiently?
Dynamics 365 Business Central is an all-in-one business management solution that’s easy to use and adapt, helping you connect your business and make smarter decisions. Built on functionality within Microsoft Dynamics NAV and adaptable to extend business applications to other Microsoft Cloud Services such as Office 365, Microsoft Flow, Power BI and PowerApps; Microsoft Dynamics 365 Business Central Solution can grow as your business requirements change while taking advantage of the latest technology.
Get better financial reporting with Jet Global- Report and Drilldown from any Combination of Data with No limitations on companies, accounts, or dimensions. Jet Reports Financials allows you to include any number and combination of companies, dimensions and accounts in your financial reports. Build your consolidation reports in minutes, get visibility across departments, and create any grouping of accounts – then drill down to see the underlying data behind the numbers to have the answers you need on-demand.
↧
Email a Link - Custom button in Dynamics CRM command bar (Ribbon)
Issue : When you have multiple entity forms driven by user's security roles, if someone userA share the record link using "Email a Link" to somebody else userB, the link goes with formid...(read more)![]()
↧
How to detect and protect against employee expense fraud
Syndicated content provided by Equisys, Inc. Original content can be found here .
Any employer wants to believe that the people working for them are completely honest.
Survey after survey, however...(read more)![]()
↧
↧
Detailed Guide on How to Use TypeScript with Dynamics 365 - Part 1: Setting up the Environment
Introduction
TyepScript is a typed superset of JavaScript that compiles into JavaScript. TypeScript has several benefits including easier OOP methodology, common errors spotting at compile time, support...(read more)![]()
↧
Returning complex types from AL functions.
I notice that AL lets us to return some complex types in functions. This function bellow saves recordref content in a Json object and return it:
procedure GetJSonFromGeneric ( var GenericRec : RecordRef...(read more)![]()
↧
Detailed Guide on How to Use TypeScript with Dynamics 365 - Part 2: Deploying TypeScript into Dynamics 365
Introduction
TypeScript is a typed superset of JavaScript that compiles into JavaScript. TypeScript has several benefits including easier OOP methodology, common errors spotting at compile time, support...(read more)![]()
↧
Deploying Package to SQL Server Integration Services Catalog (SSISDB) from Visual Studio (SSDT)
Deploying packages to SQL Server from SSDT is straightforward. We can either deploy the project or an individual SSIS Package i.e. Project Deployment or Package Deployment. (SQL Server 2016 Onwards). Here...(read more)![]()
↧
↧
Advanced Dynamics 365 JavaScript Development Course is now open
Hi Everyone, Advanced Dynamics 365 JavaScript Development course is now open. The shopping cart will close on Friday, 2 November at 7:00pm CDT. Course content will start to release on Saturday, 3 November. Visit the course page for more information and let me know if you have any questions. Thanks, Mitch Hi Everyone, Advanced […]![]()
↧
Passing parameters when calling Dynamics 365 for Finance and Operations URLs from external systems
Sometimes you might want to pass some information or commands to your D365FO application by using URL parameters. Use cases might include opening a specific record on a form, setting the mode (read/edit...(read more)![]()
↧
Filter Information – Business central
You can use filters to find required information. Filters retrieve subset of records that are corresponding to a certain value expression or formula.
Now let’s assume that you want to find items...(read more)![]()
↧
Fixed – Windows 10 Remote Desktop (RDP) not saving credentials.
Recently even after saving the credentials in connection settings to an RDP file, every time we were opening it, it was asking us to enter the password. The below steps helped us to fix the issue. Open...(read more)![]()
↧
↧
D365: Enable Cross Origin Requests in Internet Explorer
Recently, we had a requirement to load data from external domain in a web resource on a Phone Call form.
While testing the functionality in IE 11, it was not working.
Debugging the code using Developer...(read more)![]()
↧
First chance exceptions
Dynamics 365 for Finance and Operations runs completely in “.NET”, which has some interesting implications. The runtime and tools working with it (such as Visual Studio) offer many new options that may be very useful.
One of these options is the ability to catch first chance exceptions. When an exception is thrown, it’s considered a first chance exception. Visual Studio won’t break the program execution, because your program still has a chance to catch the exception and do something about it. Only if it doesn’t do that and the exception is unhandled, Visual Studio will break the program. It doesn’t happen in D365FO at all, because it has a default handler for all exceptions.
Therefore if I call code like this and never catch the exception, D365FO will still catch it and put a message to infolog.
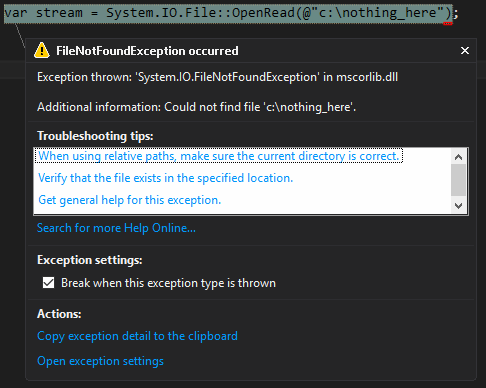
System.IO.File::OpenRead("c:\\nothing_here");
This is the result:

Now what if I you want to debug the code to see what happened? This error message contains a stack trace, therefore you can put breakpoint to the method throwing the error and run the logic again.
But often you don’t have the call stack; you have only the exception type and message:
System.IO.FileNotFoundException: Could not find file 'c:\nothing_here'.
This happens when there is an exception handler in the application that handles the error and merely puts a message to infolog. Or if it’s an X++ exception, because D365FO doesn’t show stack trace for them.
You can’t use breakpoints because you don’t know where you should put them. Wouldn’t it be great if Visual Studio interrupted execution immediately when the exception is thrown, i.e. at the first chance exception? Fortunately there is a way!
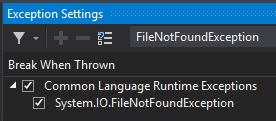
Go to Visual Studio and open Debug > Windows > Exception Settings. Expand Common Language Runtime Exceptions, find FileNotFoundException (you can use the search box on the top) and tick the checkbox.
When you run the code again (with debugging), Visual Studio breaks the program when the exception is thrown and shows the dialog which is normally used for unhandled exceptions:
The example above used a .NET exception, FileNotFoundException. But can we use something like that with native X++ exceptions? Yes, we can!
I’ll use the following piece of code for my example:
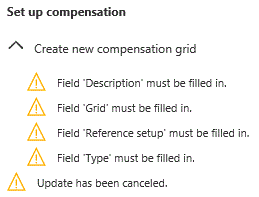
HrmCompCreateGrid::construct().run();
If I run the code, I’ll get the following messages in infolog.
I can’t merely put try/catch to my code, because there is no unhandled exception. The exception is already handled in some code called from run().
But I can ask Visual Studio to break on first chance exceptions.
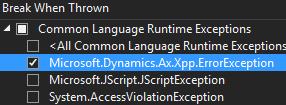
X++ doesn’t use objects for exceptions; throwing an error means throwing an enum value (throw Exception::Error). But D365FO uses CLR (“.NET runtime”) and must play but its rules, therefore every X++ exception is converted to an instance of an exception class under the hood. The class is Microsoft.Dynamics.Ax.Xpp.ErrorException.
If you open Debug > Windows > Exception Settings again, you’ll notice that Microsoft.Dynamics.Ax.Xpp.ErrorException isn’t in the list of Common Language Runtime Exceptions. But it doesn’t matter, because you can add it there.
Select Common Language Runtime Exceptions node and click the green plus button:
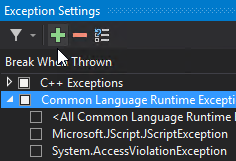
Type in Microsoft.Dynamics.Ax.Xpp.ErrorException
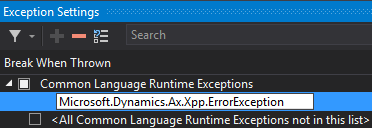
and press Enter. The exception is now in the list and Visual Studio will break every time when an X++ error exception is thrown.
When you run the demo code again (with debugging), Visual Studio will stop at the throw statement in createGrid() method.
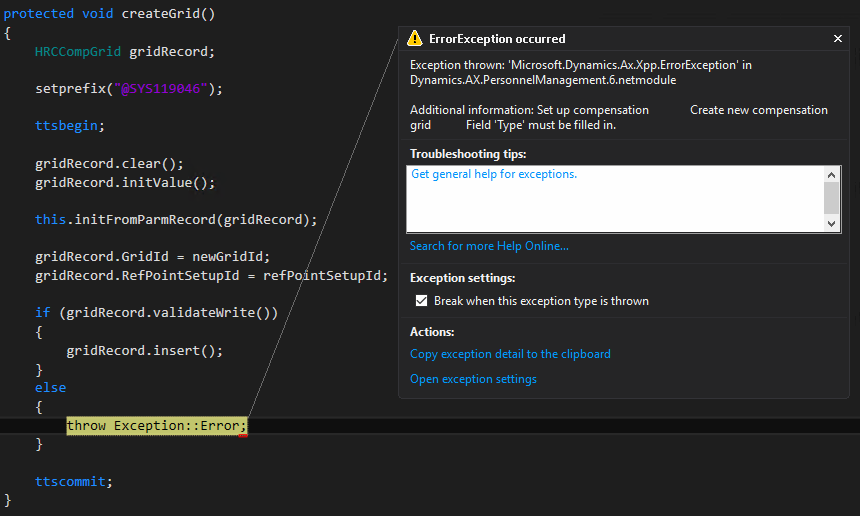 Finding the place where an exception is thrown may be time consuming, especially if it’s handled somewhere but you don’t know where. This little trick may save you a huge amount of time.
It also shows that there is a lot to gain from the new platform and from Visual Studio, if you use them creatively.
Note that things like this are also applicable to AX 2012, if X++ code is executed as CIL (which, unlike in D365FO, happens only in some cases). I sometimes intentionally ran code in CIL just to get access to features that aren’t available in the X++ debugger.
↧
Azure: Copy data from one database to another using Azure Data Factory – II
Originally posted on Ajit Patra : In the previous post, we discussed how to create Azure SQL Server and Azure SQL Database. Now that we are ready with source data/table and destination table, let’s...(read more)![]()
↧
Find D365FO labels in Powershell
You can use Dynamics 365 > Find labels… in Visual Studio to find D365FO labels, but its capabilities are quite limited. Sometimes a better option is searching through the underlying text files directly and you can easily automate it with Powershell.
The following script looks at all label files for US English and finds all labels containing either PowerBI or Power BI. It skips label comments, because you’re typically interested only in labels and not their comments.
$packagesDir='C:\AOSService\PackagesLocalDirectory\'$labelFiles=ls$packagesDir\*\*\AxLabelFile\LabelResources\en-US\*.txt
$labelFiles|Select-String-Pattern'^(?! ;).*=.*Power ?BI'|select Line, Filename, LineNumber
You might think this approach will be slow, but it actually returns result very quickly.
↧
↧
Rangos de objetos en Microsoft Dynamics 365 Business Central
Con en lanzamiento de Dynamics 365 Business Central el pasado mes de Octubre una de las muchas dudas que podemos tener los desarrolladores es conocer que numeración de objetos usar. Los que ya habéis estado...(read more)![]()
↧
MSDyn365FO Formula: Co-product & By-product. Batch attributes. Batch orders. Sponge cake example
In this blog post, I will try to go over Formulas, Co-Products, and By-Products in Microsoft Dynamics 365 for Finance and Operation using Sponge cake production as an example. We will go through the following...(read more)![]()
↧
Custom Code Tracing & Exception Logging in Dynamics 365 v.9
As a Solution Architect I often review Microsoft Dynamics 365 custom server and client side code. One of the most common rejects regards tracing and exception handling mechanisms, or their absence. Some code constructs may have empty Try/Catch blocks or none at all, other catch exceptions and just re-throw. As for tracing, code often contains […]![]()
↧


