API (Application Programming Interface) is an interface which allows applications to talk with each other. Simply put, it is more like a website, where you make a call to the server and you get a response...(read more)![]()
↧
Getting Started with Dynamics 365 Business Central APIs
↧
One Click upload from CRM Notes to SharePoint.
One Click upload from CRM Notes to SharePoint.
Upload documents with metadata, save in SharePoint in any folder structure, document library, site, and by document type.
Watch: one minute video
Download free trial: http://www.dynamicsobjects.com/Our-Solutions/SharePoint-Organizer-SPO
-
The post One Click upload from CRM Notes to SharePoint. appeared first on CRM Software Blog | Dynamics 365.
↧
↧
eXtreme 365 in Austin and Business Central
After amazing conference in The Hague this fall – Directions EMEA, we have two another great events until the end of this year. First in Europe, NAV TechDays will come in November 22-23 and after...(read more)![]()
↧
Say hi to my new blog!
Last few months I haven’t been blogging a lot due to the fact that I was really busy with starting up my own company, building a website and developing a build service for Dynamics 365 & NAV...(read more)![]()
↧
[Solved] Error while Sales order Invoice
Hi Folks,
This quick post is about an error while posting a sales order. For functional they know where is the missing piece but if you need some process to test one of your development, I would suggest to dig yourself before asking a functional folk.
Error: Account number for transaction type Cost of goods sold, invoiced does not exist.

Reason: Inventory posting have missing setup:
Solution: Go to Inventory > Setup> Posting > Posting
Check if the respective setup is missing. If yes Add record accordingly.

That’s it.
Cheers
Harry![]()
This quick post is about an error while posting a sales order. For functional they know where is the missing piece but if you need some process to test one of your development, I would suggest to dig yourself before asking a functional folk.
Error: Account number for transaction type Cost of goods sold, invoiced does not exist.

Reason: Inventory posting have missing setup:
Solution: Go to Inventory > Setup> Posting > Posting
Check if the respective setup is missing. If yes Add record accordingly.

That’s it.
Cheers
Harry
↧
↧
Dynamics 365 Installation – Part 2 – Hardware and Software requirements
In this article I will detail about hardware and software requirements for dynamics 365 installation. In our particular environment with seven different servers, which have following basic information...(read more)![]()
↧
Dynamics 365 Server version 9.0 available for download
A few days behind schedule, but the highly anticipated Dynamics 365 version 9.0 for On-Premise deployments is not available for download. Preview releases have been available for a while now via the Microsoft experience web site, but on 11/2 Microsoft made this release public.
It is now available for download on the Microsoft Download center. A 90 day trial key can be used, or if you have a commercial license key you can enter that at any time (during setup or within the 90 days trial). This version includes the Reporting extensions, just like previous version. Also, be aware of supported operating systems. The system requirement mention requirement for Windows Server 2016, but just point to the Dynamics 365 Customer Engagement document site.
↧
Manage CDS Entity Data – Microsoft PowerApps Office Add-In
Originally posted on Bansal Blogs - Dynamics 365, PowerApps, Microsoft Flows, Power BI : Microsoft PowerApps Office Add-In enables user to read, modify and insert data in CDS environment. Add-In is available...(read more)![]()
↧
Microsoft Dynamics 365 for Field Service - Connected Field Service
Hi Everyone Today i am going to discuss about the connected field services, Communication and Integration with IoT Devices. Connected Field Service 1. IOT Solution installed on top of Dynamics 365 2. Key...(read more)![]()
↧
↧
Analyzing expense receipts with Azure Cognitive Services and Microsoft Flow
Recently, Business Applications MVP Steve Endow and I delivered a session at the User Group Summits in Phoenix, and in particular, to the GPUG Summit titled, "Microsoft Dynamics GP and Azure Services". In this course we detailed a number of Azure Services (among the hundreds) that could potentially be used with Microsoft Dynamics GP.
Being that I have also been working my way through completing a Microsoft sanctioned PowerApps, Flow, and CDS self-paced, online training class offered by edX (click here for more info on the course) and presented by Business Applications MVP Shane Young, I asked myself, what could I do with Microsoft Flow and Azure Services that could benefit Microsoft Dynamics GP users?
Playing with some Azure Services, I came across Azure Cognitive Services which offers the capability of reading images and analyzing them for text via its Computer Vision service. As it turns out, this service offers an optical character recognition (OCR) feature, which is capable of returning the full text or a JSON formatted document with the text. The idea here would be to use Microsoft Flow to read a newly created receipt in a OneDrive folder and transfer the file to Cognitive Services' Computer Vision for analysis, then get back the parsed text from the OCR service.
Let's see how it's done!
Provision the Computer Vision service
The first thing is to ensure Computer Vision has been enabled as a service on your Azure tenant. For this visit the Azure Portal, click on Create a Resource, then select Computer Vision from the AI + Machine Learning category within the Azure Marketplace.
Fill in some basic information like the resource name, location, pricing tier (there's a F0 free service!), and a resource group. Click the Create button when done. This will provision your Computer Vision resource.
Copy the service endpoint address and access keys
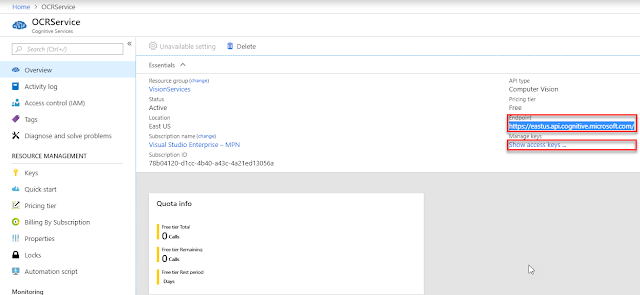
Once the service is provisioned, click on All Resources, select the Computer Vision resource you just created, then click on Overview.
Grab the service endpoint address and the access keys. You can obtain the access keys by clicking on Show access keys.. (two access keys are provided).
This is, by far, one of the easiest services to provision and requires no extra configuration, beyond establishing some access control to limit who can use the service, but that's not a topic for this discussion.
Setup a new Microsoft Flow flow
Over in Microsoft Flow, I started by setting up a blank flow and selected OneDrive's "When a file is created trigger" as this would setup the simple trigger point for when an expense receipt file is added to a Receipts folder I had previously created. You will then be prompted to setup the connection information for OneDrive.
NOTE: I selected my personal OneDrive for this, but this can also be done with a folder on your OneDrive for Business environment. In this case, you will want to authenticate with your Office 365 credentials.
Submit file to Computer Vision service
As it also turns out, Microsoft Flow has a connector to the Azure Computer Vision API, which exposes two actions: OCR to JSON and OCR to Text. Add a New Step and type Computer Vision in the search bar. Select Computer Vision API, then choose OCR to Text action.
Once again, you will be prompted for the connection information to your Computer Vision service on Azure. Enter the user account, the access key and service endpoint as gathered in step two, above.
Once credentials are entered, you can decide what to submit to Computer Vision. In this case, we what to send the File Content, which we can select from Dynamic content fields.
Configure Email step with Results
Upon completion, we want to send the resulting OCR from the analyzed image via email, so we will add another step to the flow. This time, we will a connector to Office 365 Outlook and will choose the Send an Email action for our next step.
We can then setup the properties for the Send an Email step. I have chosen to send the email to myself, and compose a subject line using the File name from the OneDrive directory. As body, I am including the Detected Text, which can be selected from the OCR to Text category under Dynamic content. I've included both the original file and content as part of the attachments.
![]()
Finally, I have given this flow a name and saved it.
Testing the Flow
I have dropped two receipt files within my OneDrive Receipts folder. These two receipts present various degrees of quality and text that can be recognized by the service. I was particularly interested in the second receipt (right) as this one was very folded and cracked so I was curious to see how it would be analyzed.
For the second receipt, the OCR service returned the JSON payload and a status 200, indicating it was successful in processing and delivering a response.
The actual email I received look like this and contained the following text:
Now, remember that my goal isn't to judge the accuracy of the OCR result delivered by Computer Vision, but rather to show how easy it is to build these kinds of solutions with Microsoft Flow and existing Azure services. Something like this would take an inordinate amount of time to build using traditional development tools and services.
Conceivably, I could create a simple PowerApps application that uses the Camera control to take the picture of the receipt and save it to my OneDrive folder. At this point, the receipt would be picked up by the Flow and analyzed by Computer Vision as we have established here. Why would this be important? Perhaps if you want to parse the JSON payload and rather submit to Microsoft Dynamics GP or Dynamics 365 as an account payables voucher, this would be useful.
Until next post,
MG.-
Mariano Gomez, MVP
![]()
![]()
![]()
![]()
![]()
![]()
![]()
![]()
![]()
Being that I have also been working my way through completing a Microsoft sanctioned PowerApps, Flow, and CDS self-paced, online training class offered by edX (click here for more info on the course) and presented by Business Applications MVP Shane Young, I asked myself, what could I do with Microsoft Flow and Azure Services that could benefit Microsoft Dynamics GP users?
Playing with some Azure Services, I came across Azure Cognitive Services which offers the capability of reading images and analyzing them for text via its Computer Vision service. As it turns out, this service offers an optical character recognition (OCR) feature, which is capable of returning the full text or a JSON formatted document with the text. The idea here would be to use Microsoft Flow to read a newly created receipt in a OneDrive folder and transfer the file to Cognitive Services' Computer Vision for analysis, then get back the parsed text from the OCR service.
Let's see how it's done!
Provision the Computer Vision service
The first thing is to ensure Computer Vision has been enabled as a service on your Azure tenant. For this visit the Azure Portal, click on Create a Resource, then select Computer Vision from the AI + Machine Learning category within the Azure Marketplace.
 |
| Computer Vision |
Fill in some basic information like the resource name, location, pricing tier (there's a F0 free service!), and a resource group. Click the Create button when done. This will provision your Computer Vision resource.
Copy the service endpoint address and access keys
Once the service is provisioned, click on All Resources, select the Computer Vision resource you just created, then click on Overview.
Grab the service endpoint address and the access keys. You can obtain the access keys by clicking on Show access keys.. (two access keys are provided).
 |
| Computer Vision service endpoint info |
This is, by far, one of the easiest services to provision and requires no extra configuration, beyond establishing some access control to limit who can use the service, but that's not a topic for this discussion.
Setup a new Microsoft Flow flow
Over in Microsoft Flow, I started by setting up a blank flow and selected OneDrive's "When a file is created trigger" as this would setup the simple trigger point for when an expense receipt file is added to a Receipts folder I had previously created. You will then be prompted to setup the connection information for OneDrive.
 |
| Blank flow with "When a file is created" trigger |
NOTE: I selected my personal OneDrive for this, but this can also be done with a folder on your OneDrive for Business environment. In this case, you will want to authenticate with your Office 365 credentials.
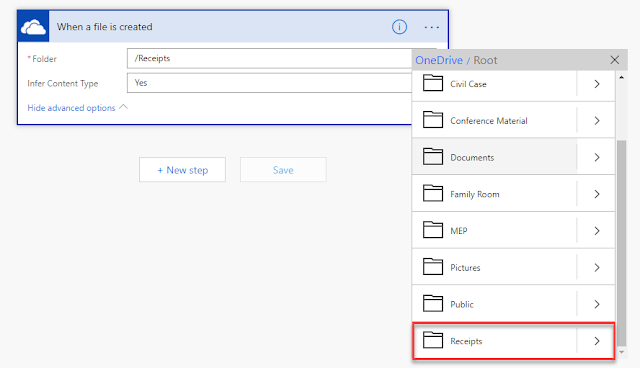 |
| Receipts folder |
Submit file to Computer Vision service
As it also turns out, Microsoft Flow has a connector to the Azure Computer Vision API, which exposes two actions: OCR to JSON and OCR to Text. Add a New Step and type Computer Vision in the search bar. Select Computer Vision API, then choose OCR to Text action.
 |
| Computer Vision API connector - OCR to Text action |
Once again, you will be prompted for the connection information to your Computer Vision service on Azure. Enter the user account, the access key and service endpoint as gathered in step two, above.
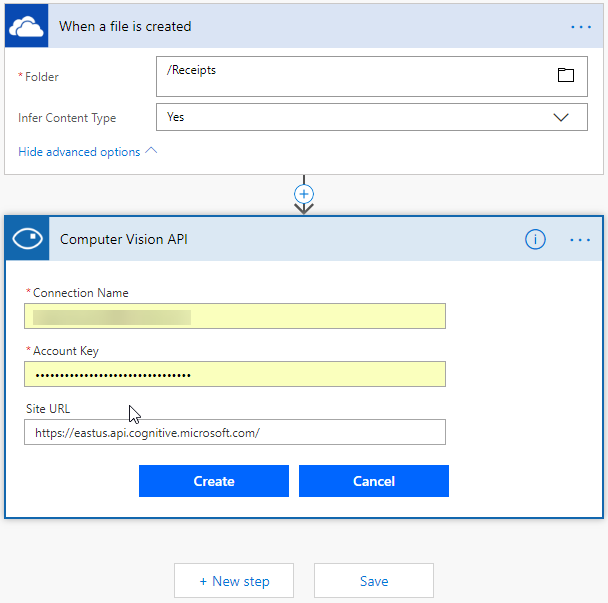 |
| Computer Vision API - credentials entry |
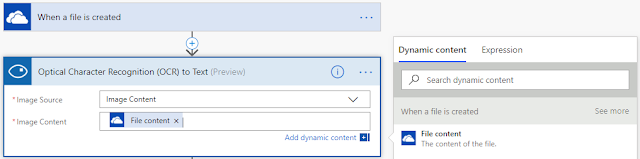 |
| File Content from Dynamics content fields |
Configure Email step with Results
Upon completion, we want to send the resulting OCR from the analyzed image via email, so we will add another step to the flow. This time, we will a connector to Office 365 Outlook and will choose the Send an Email action for our next step.
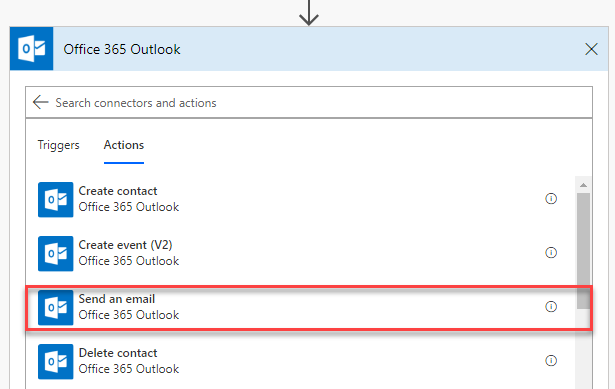 |
| Office 365 Outlook connector - Send Email action |
We can then setup the properties for the Send an Email step. I have chosen to send the email to myself, and compose a subject line using the File name from the OneDrive directory. As body, I am including the Detected Text, which can be selected from the OCR to Text category under Dynamic content. I've included both the original file and content as part of the attachments.

Finally, I have given this flow a name and saved it.
Testing the Flow
I have dropped two receipt files within my OneDrive Receipts folder. These two receipts present various degrees of quality and text that can be recognized by the service. I was particularly interested in the second receipt (right) as this one was very folded and cracked so I was curious to see how it would be analyzed.
 |
| Receipts |
 |
| JSON payload for second receipt |
The actual email I received look like this and contained the following text:
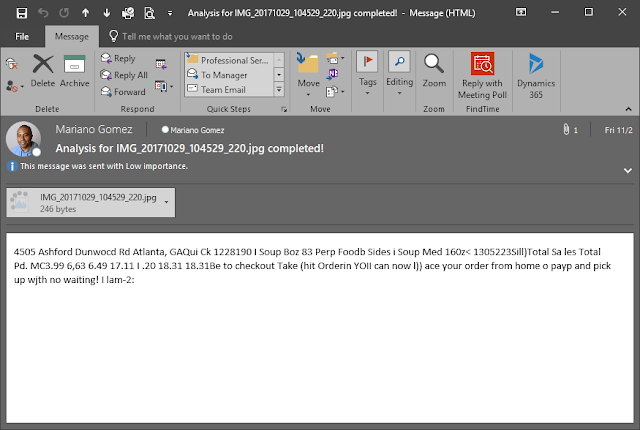 |
| Receipt analysis |
Now, remember that my goal isn't to judge the accuracy of the OCR result delivered by Computer Vision, but rather to show how easy it is to build these kinds of solutions with Microsoft Flow and existing Azure services. Something like this would take an inordinate amount of time to build using traditional development tools and services.
Conceivably, I could create a simple PowerApps application that uses the Camera control to take the picture of the receipt and save it to my OneDrive folder. At this point, the receipt would be picked up by the Flow and analyzed by Computer Vision as we have established here. Why would this be important? Perhaps if you want to parse the JSON payload and rather submit to Microsoft Dynamics GP or Dynamics 365 as an account payables voucher, this would be useful.
Until next post,
MG.-
Mariano Gomez, MVP


↧
Customize Time Entry form on Calendar View for D365 PSA
Many times, users come back requesting that they need to be able to add types of time entries of their own. Sure, you can modify the Time Entry Type OptionSet that comes with D365 PSA by default. But that...(read more)![]()
↧
Integrate Business Central On-Prem with Flow
Hi,
in this blog post I will write about new connector for Dynamics 365 Business Central On-Prem and how to use it to integrate Flow with Dynamics 365 Business Central On-Prem.
First thing which must...(read more)![]()
↧
Detailed Guide on How to Use TypeScript with Dynamics 365 - Part 3: Debugging TypeScript within Dynamics 365
Introduction
TypeScript is a typed superset of JavaScript that compiles into JavaScript. TypeScript has several benefits including easier OOP methodology, common errors spotting at compile time, support...(read more)![]()
↧
↧
Business Central – Upgrade Task 17 Pages und Reports im Web Client suchbar machen
Sollten Sie nach dem Upgrade auf Microsoft Dynamics 365 Business Central feststellen, dass Ihre Pages und Reports im Web Client über die Suchfunktion (die Glühbirne rechts oben neben Einstellungen und Hilfe) nicht mehr auffindbar sind, haben Sie den «Upgrade Task 17: Configure pages and reports included in the MenuSuite to be searchable in the Web client« vergessen durchzuführen (https://docs.microsoft.com/en-us/dynamics365/business-central/dev-itpro/upgrade/upgrading-the-data).
In der Vergangenheit wurden alle Pages und Reports automatisch gefunden, für die ein Menüpunkt existiert. Das ist vorbei. Für Pages und Reports gibt es jetzt ein neues Property »UsageCategory«. Das muss gesetzt sein, damit die Pages und Reports auffindbar werden. Die Details können Sie hier nachlesen: https://docs.microsoft.com/en-us/dynamics365/business-central/dev-itpro/developer/devenv-al-menusuite-functionality
Praktischer Weise liefert Microsoft ein PowerShell-Skript (»TransitionMenuSuiteObjectsForSearch.psm1«) mit, mit dem Sie dieses Property anhand der vorhandenen MenuSuites setzen können. Wo Sie dieses Skript finden und wie Sie es anwenden, finden Sie hier dokumentiert: https://docs.microsoft.com/en-us/dynamics365/business-central/dev-itpro/upgrade/upgrade-pages-report-for-search
Leider hat sich in dieses Skript ein Fehler eingeschlichen. Die Möglichkeit, die geänderten Objekte mit der Option »ImportToDatabase« automatisch in die Datenbank zu importieren, funktioniert nicht. Zwei Funktionen müssen korrigiert werden.
(1) Die Variablen $DBServer, $DBName, $DBUser und $DBPassword sind nicht definiert. Die Abbildung unten zeigt die richtigen Variablennamen.
 (2) Den Parameter »authentication« gibt es für die finsql.exe nicht. Richtig heißt dieser Parameter »ntauthentication«. Dieser Fehler fällt aber nur auf, wenn Sie mit SQL Server Authentifizierung arbeiten.
 Zu guter Letzt noch ein Warnhinweis. Das Skript durchläuft alle MenuSuite-Objekte und das letzte MenuSuite-Objekt (also die Partner- oder Company-Ebene) definiert das Property »UsageCategory«. Unter Umständen werden also auch Standard-Objekte geändert, um die »UsageCategory« zu setzen. Das finde ich persönlich nicht so schön. Wir haben daher eine zusätzliche Option eingebaut, um nur die individuellen Pages und Reports zu ändern.
↧
How to Hit a Home Run with User Adoption After Your CRM Implementation
 After you’ve completed your CRM project implementation, it’s time to continue gaining CRM User Adoption.
CRM User Adoption is arguably the most important step of any CRM implementation project.
In baseball, you can think of this step of your CRM project as building your fan base.
Without continuous user adoption, all of the other work you’ve put into your CRM project will have been wasted.
If Users fail to use your CRM system, it will fail to live up to its capabilities.
Once you implement CRM, CRM should be at the core of your business.
To help your Users see it this way, you need to communicate the “Bigger Picture” of your CRM project to them. Express how it will increase your business value.
Get them involved with your CRM project from the get-go to increase user adoption. By including them in the conversation from the start, you’re more likely to get them on board and keep them there.
By doing this, you show you respect and appreciate their feedback. Continue to encourage them throughout phases of your CRM project.
Help them to see opportunities and lessons in “failures.” You are all learning about CRM together. No one will be perfect. Mistakes will be made, but there is always a solution.
Train and retrain Users as you see fit. Schedule regular training to keep user adoption high.
Don’t just think: “Build it and they will come,” but rather, “Build it so it’s easy to use and is beneficial, and they will come!”
When users see the benefits, adoption increases, excitement builds, and your “fan base” thrives!
Allow your CRM system evolve the way it was intended to when you encourage and enable your Users to adopt it and evolve with it.
Gaining User Adoption is a comprehensive process, so Ledgeview has 5 eBooks to help you achieve User Adoption Success from the start of your project to years after, to debunking common misconceptions along the way.
Access these resources when you click the titles below:
- 10 Expert CRM Tips on Achieving High User Adoption from the Start
- 10 CRM Misconceptions on Gaining User Adoption
- 10 Expert CRM Tips on Gaining User Adoption During Rollout
- 10 Expert CRM Tips on Gaining User Adoption After Rollout Day and Beyond
- 10 Expert CRM Tips to Get Your Users Excited About CRM (Again)
For more tips on how to have a successful CRM Implementation, get Ledgeview’s latest eBook, “10 Steps to a Successful CRM Implementation: Preparing for a Winning Season.”

↧
Microsoft Ignite 2018 - Business Applications Sessions List
Microsoft Ignite is Microsoft's largest conference for developers, business professionals and executives. It showcases Microsoft's latest solutions through 700+ sessions over multiple days. The...(read more)![]()
↧
Tip #1185: Customize the document grid
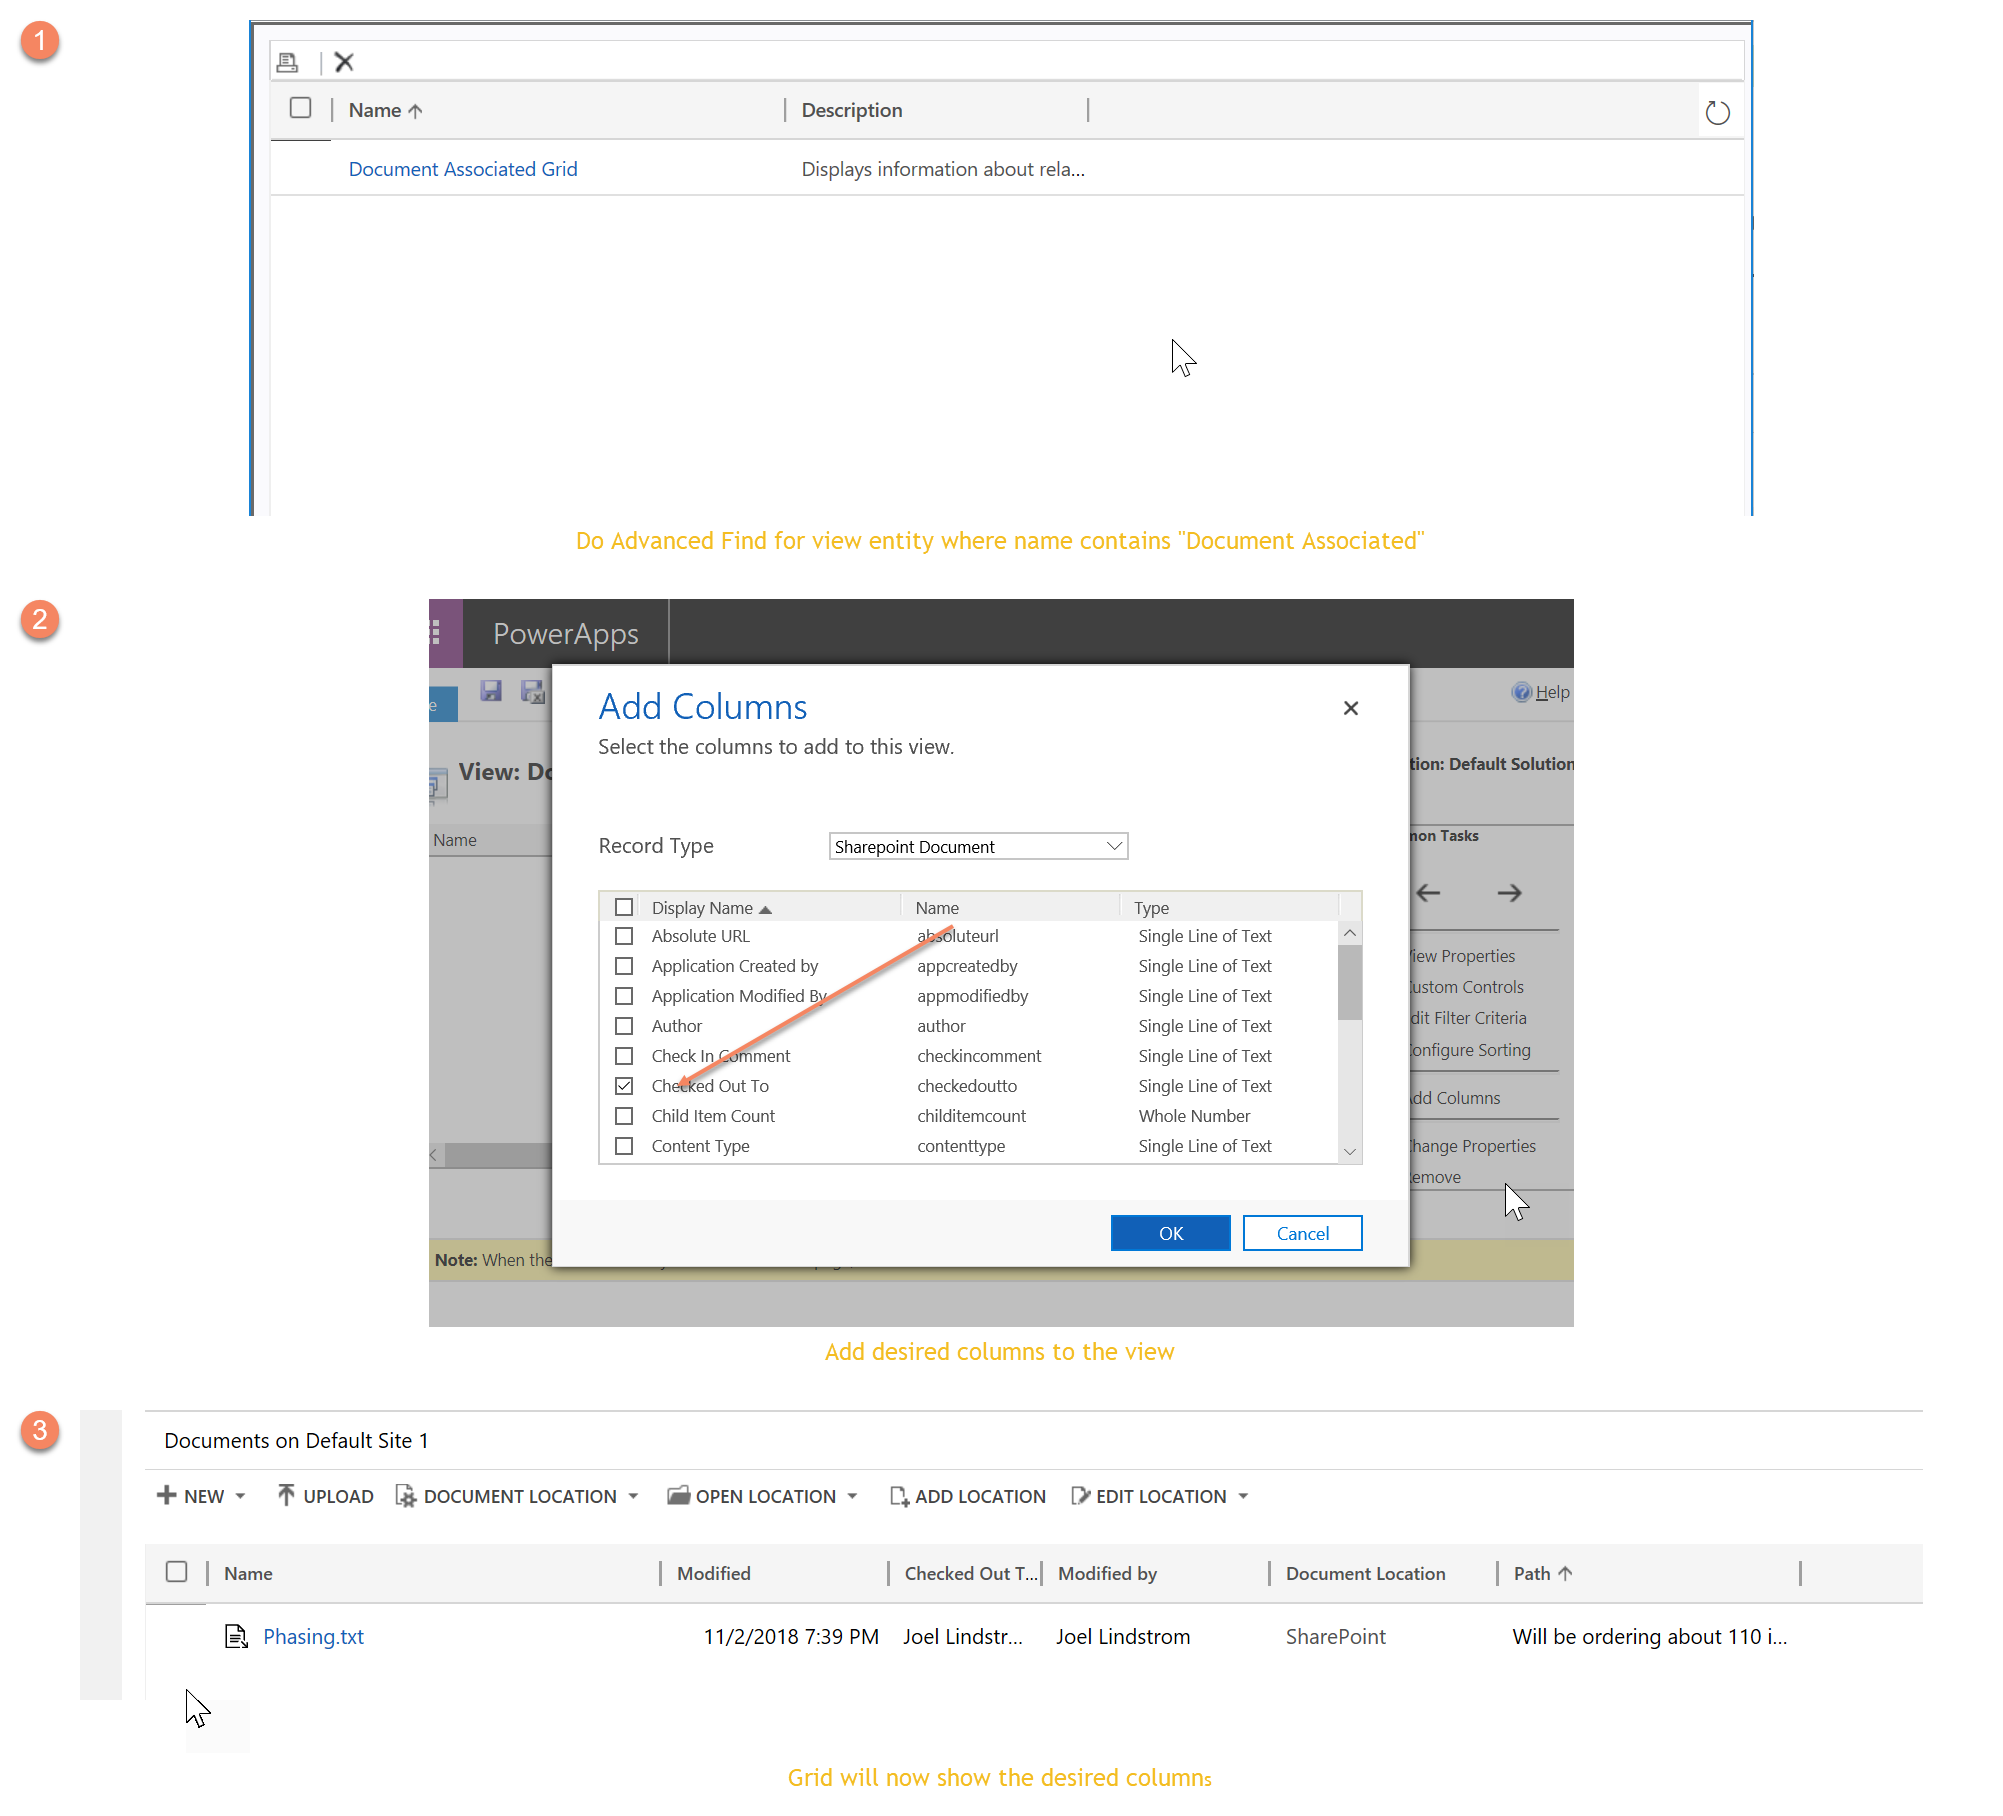
I upgraded to server side SharePoint integration and now I don’t see enough detail from the document grid. It doesn’t show me who checked out the file, and I have to open the SharePoint location to see who checked it out.
Reader
Good news–with server-side SharePoint integration you can customize the grid more than you could with the client side grid control.
Do an advanced find of the view entity for where the name contains “Document Associated.” From there you can add a bunch of additional fields to the grid view.
(Facebook and Twitter cover photo by Stefan Schweihofer on Pixabay)
↧
↧
Hands On with Microsoft Dynamics GP 2018 R2: Create Company Using PowerShell
 Microsoft Dynamics GP 2018 R2 was released on the 2nd October. In this series of posts, I’ll be going hands on and installing the majority of the components; some of them, such as Analysis Cubes for Excel, which are little used, I won’t be covering.
The series index will automatically update as posts go-live in this series.
GP PowerShell can be used to create companies and other actions. The following example shows how GP PowerShell can be used to create a new company:

Add-CompanyDatabase -GPClientDirectory "C:\Program Files (x86)\Microsoft Dynamics\GP2018" -SqlAdmin "sa" -SqlAdminPassword "password" -SqlServerName "SERVER\GP" -CompanyName "azurecurve Publishing" -CompanyDbName "A18R2"-SqlMdfFilePath "C:\SQL Server\Data\" -SqlMdfFileName "GPSA18R2Dat.mdf" -SqlLdfFilePath "C:\SQL Server\Data\" -SqlLdfFileName "GPSA18R2Dat.ldf"The supplied parameters and their values are:
- -GPClientDirectory “C:\Program Files (x86)\Microsoft Dynamics\GP2018”
- -SqlAdmin “sa”
- -SqlAdminPassword “password”
- -SqlServerName “SERVER\GP”
- -CompanyName “azurecurve Publishing”
- -CompanyDbName “A18R2”
- -SqlMdfFilePath “C:\SQLServer\Data\”
- -SqlMdfFileName “GPSA18R2Dat.mdf”
- -SqlLdfFilePath “C:\SQLServer\Data\”
- -SqlLdfFileName “GPSA18R2Dat.ldf”
the text between the quotation marks needs to be changed to the values you want to use to create the company.
Enter the cmdlet and parameters into GP PowerShell and hit return and the cmdlet will launch GP Utilities and create the new company; if you have any missing parameters or errors the launch will fail (usually with a less than helpful message).
Click to show/hide the Hands On with Microsoft Dynamics GP 2018 R2 Series Index
Read original post Hands On with Microsoft Dynamics GP 2018 R2: Create Company Using PowerShell at azurecurve|Ramblings of a Dynamics GP Consultant
↧
MB6 – 898 Describe features of the People workspace
In the search field of the people workspace you can search for people by name, title and other parameters. You can see how many direct reports they have and whom they report to. When you click on a person...(read more)![]()
↧
Duplicate Detection When Qualifying Leads in Dynamics 365 - Part 1
This blog series is about duplicate detection rules when qualifying a Lead.
When a Lead record gets qualified, the Lead gets converted to an Opportunity record, and Account or Contact records are created in the process. During the Lead Qualification process, I noticed a duplicate warning prompt that appears after I clicked the Qualify button:

This blog will highlight the behavior of this prompt and allow you to refine your duplication detection criteria for this process.
The currently defined and published duplicate detection rules are:

These are the out-of-the-box duplication detection rules defined on a freshly created Dynamics 365 instance and are configured to detect exact matches.
Testing Duplication Detection Rules
I created the Lead ‘Miguel Lead Test 1’and qualified it. This created an Opportunity, Account, and Contact record.

The Account was automatically created with Account Name = “Miguel Test Ltd”.
The Contact record was automatically created with Full Name = “Miguel Test1” and Email = “miguel@test.com”.
I created another Lead record with the Contact Name ‘Miguel Test2’ and email address miguel@test.com. This conflicted with the first Lead created as they have the same email address so the Duplicates Detected prompt appears:

I saved it so there are 2 Leads in the system with the same email address.
I then qualified the Lead record ‘Miguel Lead Test 2’. Before the Account and Contact records were created for this Lead, I got the duplicate warning prompt below:

Clicking the Account and Contact lookup fields showed that there was already an existing Account and Contact record, which are the Accounts and Contact records created for the initial Lead record ‘Miguel Lead Test 1’.

The system was detecting that if it created an Account or Contact record via the Qualify process for ‘Miguel Lead Test 2’, they will be duplicated of the Account and Contact records which were created from ‘Miguel Lead Test 1’. This is because the Contacts will have the same email address miguel@test.com, and the Accounts will have the same Account Name ‘Miguel Test Ltd’.
Unpublishing Duplicate Detection Rules
I then unpublished the duplicate detection rule ‘Contacts with the same e-mail address’. Then I tried to qualify the ‘Miguel Lead Test 2’. I got the same duplicate warning error, but when I clicked the Contact lookup I got no results:

I then unpublished the duplicate detection rule for ‘Accounts with the same Account Name’. Similarly, when I tried to qualify ‘Miguel Lead test 2’ I got no results when clicking the Account lookup control:

I then unpublished all the duplicate detection rules including the one for Leads, and qualified ‘Miguel Lead test 2’. The duplicate warning prompt did not appear, and the Lead qualified.
In summary:
• the criteria for the ‘Duplicate warning’ prompt will only appear if the Lead record on Qualify is triggering a Lead duplicate detection rule
• the criteria for search results appearing under the Account/ Contact lookup for the ‘Duplicate warning’ prompt depends on whether the new Account/ Contact record to be created during the Qualification process is triggering an Account/ Contact duplicate detection rule, e.g. Base Type = Contact, Matching Type = Contact, Criteria = Email Address Exact Match
I hope this blog will guide you towards refining your criteria for duplicate detection during the Lead Qualification process.
Part 2 of this blog series will expand on this interesting behaviour for duplicate detection rules with different base and matching record types.
This feature was noted as of Microsoft Dynamics 365 Version 1710 (9.0.2.2074) online.
↧